
Creating a consistent character across multiple shots is one of the most useful workflows for character-led AI video. A single strong clip can work on its own, but a sequence falls apart the moment the same person appears in the next shot with a different face, jawline, hairline, age, or overall identity.
The most reliable approach to character consistency is to stop asking text alone to recreate the same person. Instead, use one strong reference image as the identity anchor, then let each prompt control the action, environment, camera, lighting, and mood.
The workflow is simple:
Reference image = identity.Prompt = scene, action, camera, and atmosphere.
This guide explains how to build a MiniMax H3 consistent character step by step: choosing a stronger reference image, using Subject Reference, writing better prompts, building several scenes with the same face, controlling wardrobe and camera changes, troubleshooting identity drift, and turning the process into a repeatable multi-shot workflow. Everything here maps to what the MiniMax H3 generator actually does in the browser.
Create your first consistent character with MiniMax H3.
What “consistent character” means
A consistent character is someone who stays recognizably the same even when the video around them changes.
Imagine three clips: a woman standing inside a photography studio, the same woman walking through a city street at night, and the same woman sitting beside a café window. The location changes, the action changes, the camera changes, the lighting changes—but the viewer should still immediately recognize the same person.
Consistency can involve facial structure, eyes, nose and jawline, hair, approximate age, distinctive features, wardrobe, accessories, and overall visual identity. Not every element needs to stay identical in every project—you might deliberately change clothing, hairstyle, or makeup between scenes. The important point is that the character should still read as the same person.
That is why a strong workflow separates permanent identity from scene-specific information. The reference image handles identity; the prompt handles what changes.
Why character identity drifts in AI video
Understanding why a character changes helps explain why Subject Reference matters.
Suppose you write: a 28-year-old woman with shoulder-length brown hair, green eyes, and soft facial features. That sounds specific to a human reader, but it describes a category of possible people rather than one exact identity—many different faces could satisfy it. Generate several independent shots from that text alone, and the model still has room to reinterpret the jaw, the eyes, the nose, the hair length, the hairline, the age.
The next video may follow every written instruction and still look like a different person. Text is a loose specification, and loose specifications produce variety. For character consistency, identity therefore needs a stronger visual anchor than adjectives alone. That is where Subject Reference becomes useful.
What Subject Reference is in MiniMax H3
Subject Reference is intended for workflows where maintaining a recognizable face or character matters. It is one of the four generation modes in MiniMax H3, alongside Text to Video, Image to Video, and First & Last Frame.
Instead of describing the person only with text, you provide a visual reference. MiniMax H3 uses that subject as an identity anchor while the prompt changes the world around them. The basic loop looks like this:
Reference image → Subject Reference → scene prompt → generate → reuse reference → new scene prompt.
That makes Subject Reference particularly useful for character-led short films, multi-shot ads, social video series, fashion concepts, music-video ideas, storyboards, recurring virtual characters, and campaign variations.
One important limitation is worth understanding early: the reference primarily anchors the recognizable subject. Wardrobe, hairstyle, accessories, and other continuity details still depend heavily on how consistently they are described in the prompt. A face reference does not mean every visual detail will automatically stay identical across every shot. For real character consistency, the reference and the prompt need to work together.
Step 1 — Choose one strong reference image
Everything begins with the reference. A strong reference gives the model clearer identity information; a weak one forces more interpretation, which increases drift.
A good reference image ideally has a clearly visible face, sharp detail, natural or even lighting, minimal blur, no heavy filters, limited occlusion, a simple background, one main subject, and a useful frontal or three-quarter angle.
Avoid starting from images where sunglasses hide the eyes, hair covers most of the face, the subject is tiny in frame, motion blur has removed facial detail, several people appear together, strong shadows hide the facial structure, or extreme stylization makes identity ambiguous. A simple rule: if the important facial features are difficult for you to identify, the image is probably not an ideal identity reference.
Reference quality often matters more than adding another paragraph to the prompt.
Step 2 — Open Subject Reference

Open the MiniMax H3 generator and select Subject Reference mode. Upload the character image you prepared.
Once the reference is added, change how you think about prompting. Do not use the prompt to recreate the entire face—the reference already supplies much of that information. Use the prompt to explain what the referenced character should do next.
Open MiniMax H3 and upload your character reference.
Step 3 — Separate identity from scene
A strong prompt splits into two layers.
Identity layer — keep this short and stable: keep the referenced character recognizable, preserve the subject’s core facial identity, or use the same referenced woman as the main character.
Scene layer — describe what changes: location, action, wardrobe, framing, camera movement, lighting, and mood.
Compare two prompts.
Weak prompt: A beautiful 28-year-old woman with brown hair, green eyes, a narrow nose, an oval face, soft jawline, and symmetrical features walking through Tokyo. This spends most of its words reconstructing the face—pushing the model back toward text-driven variation.
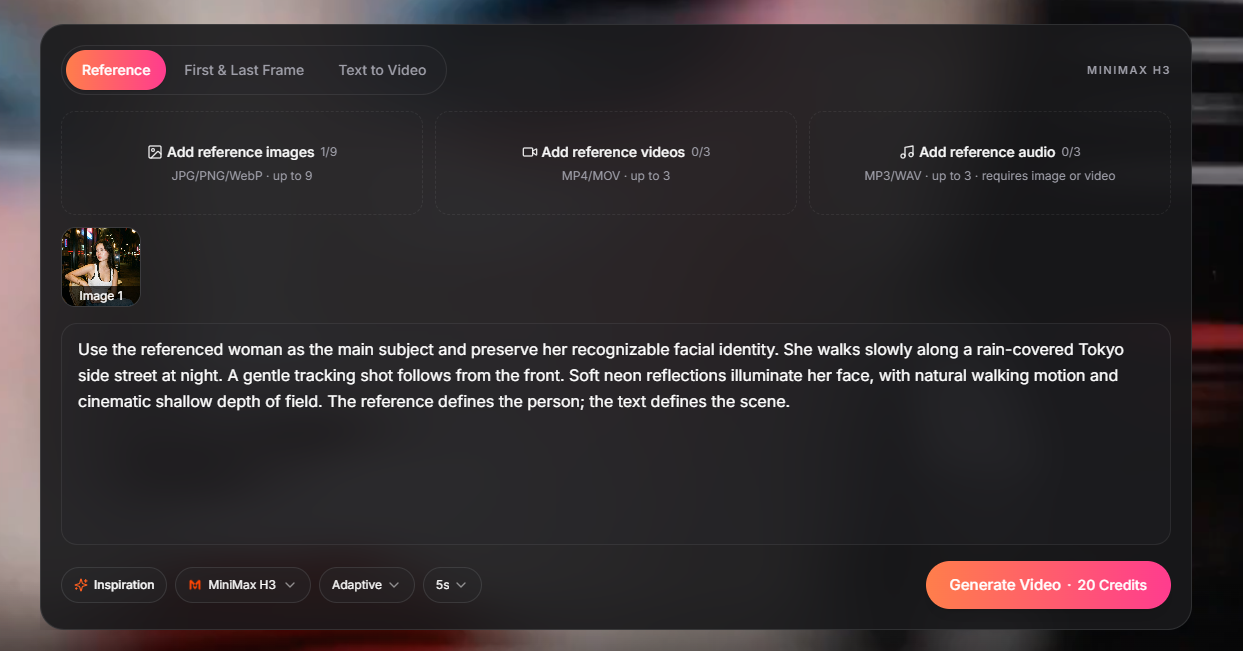
Better prompt: Use the referenced woman as the main subject and preserve her recognizable facial identity. She walks slowly along a rain-covered Tokyo side street at night. A gentle tracking shot follows from the front. Soft neon reflections illuminate her face, with natural walking motion and cinematic shallow depth of field. The reference defines the person; the text defines the scene.
A simple prompt formula
A useful structure:
Identity instruction + action + setting + camera + lighting + mood.
For example: Keep the referenced character recognizable and preserve her core facial identity. She stands beside a large window and slowly turns toward the camera. Medium close-up, subtle cinematic push-in, soft morning window light, natural expression, quiet editorial atmosphere.
The formula is deliberately simple. When consistency is the goal, more instructions are not automatically better—every additional instruction creates another variable for the model to interpret. For more general prompting patterns, see the MiniMax H3 prompt guide.
The three-shot workflow
The easiest way to test character consistency is to create several scenes using the exact same identity reference. The most important rule: do not change the reference image between shots. Keep the identity anchor fixed and change the scene around it.
Shot 1 — Studio portrait
Upload the main reference and use:
Keep the referenced woman’s facial identity and defining features consistent. She stands in a minimalist photography studio wearing a structured black jacket over a white shirt. She looks toward the camera, then slightly turns her head. Medium close-up, static camera with a very subtle push-in, large softbox lighting, natural skin texture, restrained motion, premium editorial portrait style.
This scene tests facial preservation, a small head movement, close framing, and controlled lighting. Because it is simple, it creates a useful baseline—before building a complex sequence, confirm the character works under controlled conditions.
Shot 2 — Night street
Keep the exact same reference image. Now change the environment and action:
Keep the same referenced woman’s facial identity recognizable. She walks slowly along a narrow city street after rain, wearing the same structured black jacket over a white shirt. Neon signs reflect across the wet pavement as she briefly looks toward the camera. Smooth backward tracking shot, medium framing, soft blue and warm neon light across the face, realistic walking motion, cinematic nighttime atmosphere.
What changed: environment, action, camera movement, lighting. What stayed stable: the reference image, the identity instruction, the wardrobe wording. That is the core principle of a consistent-character workflow—change selected scene variables while keeping the identity anchor fixed.
Shot 3 — Café interior
Keep the same reference again:
Preserve the recognizable identity of the same referenced woman. She sits beside a café window with a ceramic coffee cup on the table, then turns from the window toward the camera with a subtle relaxed expression. Slow cinematic push-in from a medium shot, warm afternoon window light, shallow depth of field, natural body movement, intimate lifestyle-film atmosphere.
You now have Studio → Night Street → Café. The scene changes substantially while the character identity stays recognizable—a far more useful way to evaluate MiniMax H3 character consistency than generating three unrelated characters from three independent text prompts.
Why change only one or two variables at a time
Controlled iteration matters. Suppose Shot 1 looks good. For Shot 2 you simultaneously change the reference image, hairstyle, clothing, environment, camera, makeup, lighting, expression, and action—and the identity breaks. Which change caused it? There is no clear answer.
A better process is to hold the reference fixed and step through prompts: Reference A + Prompt A, then Reference A + Prompt B, then Reference A + Prompt C. If the character stays recognizable after each step, the reference and identity wording are working. If the face changes after one specific adjustment, you know where the problem began. That makes the workflow repeatable instead of random.
Should you describe the face in every prompt?
Usually, no. If the reference already establishes the character, repeatedly writing detailed descriptions—brown eyes, oval face, small nose, high cheekbones, a specific jawline, an exact eyebrow shape—can create competing identity instructions that fight the reference.
Use short, stable wording instead: keep the referenced character recognizable, preserve the subject’s core facial identity, use the same referenced woman. Then use the rest of the prompt to describe what actually changes.
How to keep wardrobe consistent
Face consistency and wardrobe continuity are separate challenges. In the generator, the reference anchors the face, so wardrobe continuity depends on your wording—it needs deliberate attention. If the same clothing should appear in every shot, use the same specific phrase every time: structured black jacket over a white shirt in Shot 1, and the identical phrase in Shots 2 and 3.
Avoid drifting between loose synonyms like black outfit, dark fashionable clothing, formal jacket, or stylish coat. These sound similar to a human reader but invite different visual interpretations. When continuity matters, repeat the same phrase.
How to change clothes without losing the character
Sometimes the face should stay the same while the wardrobe changes. Treat clothing as one controlled variable—and because the reference is holding the face, not the clothes, the change lives entirely in your prompt:
Preserve the referenced woman’s recognizable facial identity and hairstyle. Change her clothing to a dark green evening dress with a simple silhouette. She stands in a softly lit hotel lobby, medium shot, slow cinematic push-in.
Notice what stays protected: face, identity, hairstyle. Only the wardrobe changes significantly. Avoid changing wardrobe, hair, makeup, camera angle, lighting, and action all at once when you are testing identity stability. Make one difficult change first, then add the next.
Does camera angle affect consistency?
Camera conditions can make identity preservation easier or harder. A frontal medium close-up shows more facial information than an extreme profile, a back-facing shot, a distant wide shot, a fast orbit, heavy motion blur, or a face hidden by foreground objects.
This does not mean creative camera angles should be avoided—it means you should increase difficulty gradually:
Frontal medium shot — establish the identity baseline.
Three-quarter angle — introduce moderate facial rotation.
Profile or moving camera — increase the visual challenge.
Wider action shot — test consistency while the character occupies less of the frame.
This staged process makes it easier to identify where consistency begins to weaken.
Best prompt habits for consistency
Keep one main action. Prefer she walks slowly toward the camera and briefly looks to her left over a chain of stacked actions. One readable action creates fewer competing priorities.
Use one main camera move. A single idea like slow tracking shot moving backward in front of the character beats stacking push-in, orbit, crane, zoom, and whip pan in one short shot.
Keep identity wording stable. If preserve the referenced woman’s recognizable facial identity works, reuse it—do not rewrite the identity description for every scene.
Keep important wardrobe language stable. Continuity improves when important visual details are described the same way each time.
Let the reference do its job. A strong reference-based workflow should not turn back into text-only character generation through an enormous facial description.
Common problems and fixes
The face changes between shots. Likely causes: a weak reference, an extreme viewing angle, heavy occlusion, too many simultaneous changes, or a prompt that redefines the character. Return to a clean reference, simplify the scene, keep identity wording stable, and cut unnecessary appearance descriptions.
The character looks older or younger. Lighting, makeup, and explicit age descriptions can shift perceived age. Avoid repeatedly redefining the age after the reference is set, and use clear facial lighting while testing.
The hairstyle changes. Hair is visually complex and reacts strongly to motion. Keep hairstyle wording stable when continuity matters, and avoid combining major hair changes with difficult action or camera movement.
Clothing changes unexpectedly. Reuse the exact same wardrobe phrase across scenes.
Close-ups work but wide shots do not. A face occupies less visual space in a wide shot. Establish consistency with medium framing first, then gradually move wider.
Side profiles look less similar. A frontal reference provides less information about an extreme side profile. Move gradually from frontal to three-quarter to profile views.
Every generation looks like a different person. Stop changing everything at once. Return to one strong reference and one simple scene, then rebuild the sequence step by step.
Subject Reference vs Image to Video
These workflows solve different problems.
Use Subject Reference when identity matters most—the same character appears in multiple scenes, locations change, camera setups change, actions change, or you are creating a recurring character.
Use Image to Video when the exact starting composition matters—you already have finished artwork, a product or character must begin in a specific pose, or you mainly want to animate an existing still.
For a broader overview of the modes, see how to use MiniMax H3. If your primary goal is keeping the same face while the environment changes, Subject Reference is the more directly relevant workflow to test.
A repeatable multi-shot workflow
If you are producing a campaign, short film, or longer character sequence, create a simple character sheet before generating:
Reference: one primary identity reference.
Identity line: preserve the recognizable identity and core facial features of the referenced woman.
Wardrobe: structured black jacket over a plain white shirt.
Default camera style: natural cinematic camera movement, medium framing.
Visual style: realistic skin, restrained movement, cinematic commercial lighting.
Then create new scenes mainly by changing the location, the action, the camera movement, and lighting when necessary. This makes the workflow much easier to scale from three shots to ten or twenty.
Quick checklist
Before generating: Is the reference sharp? Is the face clearly visible? Is only one main person present? Is the identity instruction short and stable? Does the prompt focus on the scene? Is there one main action and one main camera move? Is important wardrobe wording consistent?
After generating: Does the face remain recognizable? Are the eyes and facial structure stable? Does the hairstyle remain believable? Has the outfit changed unexpectedly? Has the camera introduced distortion? Is the motion too aggressive? Did unexpected characters appear? Which single variable should you adjust next?
Do not change five variables because one failed. Find the biggest problem first, then iterate.
Use MiniMax H3 to test the same character across three different scenes.
Final thoughts
A reliable consistent-character workflow does not begin with a huge prompt—it begins with a strong identity anchor. Choose one clear reference image and let it establish who the character is. Use the prompt to define what the character does, where the scene happens, how the camera moves, and what the lighting looks like. Then reuse the same reference across the sequence: start with a simple shot, confirm the face, change one or two variables, and test again. Only increase scene complexity after the character identity stays recognizable.
The rule worth remembering: the reference owns identity; the prompt owns the scene. That separation makes it easier to carry the same character from a studio portrait to a city street, a café, an advertisement, a short film, or a larger multi-shot campaign. For creators building recurring characters instead of isolated clips, that repeatability is what makes a MiniMax H3 consistent character workflow genuinely useful.
Create your first consistent character with MiniMax H3.
FAQ
Can MiniMax H3 keep the same character across multiple videos?
Subject Reference is designed to help retain recognizable features from a supplied character reference while generating different scenes. Reusing the same reference image and stable identity wording gives the workflow a stronger continuity anchor.
How do I create a consistent character in MiniMax H3?
Start with one strong facial reference, use it as the subject reference, keep identity wording simple, describe the scene separately, and reuse the same reference across every shot. Change only a limited number of variables between generations.
What is the best reference image for character consistency?
A sharp, well-lit image where the face is clearly visible and large enough to show important features. A simple background and frontal or three-quarter view are useful starting points.
Should I describe the entire face in every prompt?
Usually not. When the subject reference already establishes identity, the prompt can focus mainly on action, setting, camera, lighting, and mood.
How do I keep the same clothes across shots?
Use the same specific wardrobe wording in every relevant prompt. In the generator the reference anchors the face, so clothing continuity depends on your phrasing—avoid switching between loose synonyms when the outfit needs to match.
Can I change clothes while keeping the same character?
Treat wardrobe as a controlled variable. Keep the same identity reference and identity instruction, change the clothing description, and avoid simultaneously changing several other major visual elements.
Why does my character’s face change between generations?
Common causes include a weak reference image, extreme camera angles, facial occlusion, heavy motion, conflicting appearance descriptions, or changing too many variables between shots.
Is Subject Reference better than Text to Video for consistent characters?
If maintaining one recognizable identity is the main goal, a visual subject reference provides a more direct identity anchor than repeatedly describing the same person using text alone.
Is Subject Reference better than Image to Video for character consistency?
They serve different goals. Subject Reference is better suited to keeping a recognizable character while scenes change. Image to Video is more useful when the exact starting image and composition need to be animated.